Printing documents should be a simple task, yet many users experience constant frustration when pages come out cut, too small, in the wrong orientation, missing colors, printed on only one side when double sided was expected, or even sent to the wrong printer entirely.
These problems are extremely common and rarely mean that the printer is broken, because in most cases the issue is related to basic print settings that were not reviewed carefully before clicking the print button.
This complete guide on how to print documents correctly was created for users who want to stop wasting paper, ink, and time, learning how to configure prints in a calm, practical, and predictable way, whether using Windows or macOS.
Throughout this article, you will learn how printing works in simple terms, how to choose the correct printer, how to understand and adjust the most common print options, how to preview documents before printing, how to configure page size and orientation, how to use double sided printing properly, and how to save ink without sacrificing readability.
The goal is to help you feel confident every time you print, especially when dealing with important documents, school work, forms, or professional materials.
Understanding Why Printing Goes Wrong So Often
Most printing mistakes happen because computers offer many options in the print dialog, and users often skip these settings, assuming the system will automatically choose the correct configuration.
However, printers follow instructions exactly as they are set, which means a small unchecked option can lead to big and frustrating results.
Common Reasons Printing Fails
- Wrong printer selected.
- Incorrect paper size.
- Wrong page orientation.
- Color settings not reviewed.
- Double sided option disabled.
Knowing these causes already reduces mistakes.
How Printing Works in Simple Terms
When you print a document, your computer sends instructions to the printer telling it exactly how to place content on paper, including size, margins, orientation, color mode, and number of copies.
If these instructions do not match the paper in the printer or the intention of the document, the final result will not look right.
The Basic Printing Flow
- You open a document.
- You choose Print.
- You review print settings.
- The printer follows those settings exactly.
The key step is reviewing the settings.
Choosing the Correct Printer Before Anything Else
Many homes and offices have more than one printer installed, including virtual printers such as PDF printers, which makes selecting the correct device essential.
Why Printer Selection Matters
- Different printers support different paper sizes.
- Not all printers support color.
- Double sided printing may vary.
Always confirm the printer name.
How to Check the Selected Printer
- Look at the top of the print dialog.
- Confirm the printer model.
This simple check avoids many errors.
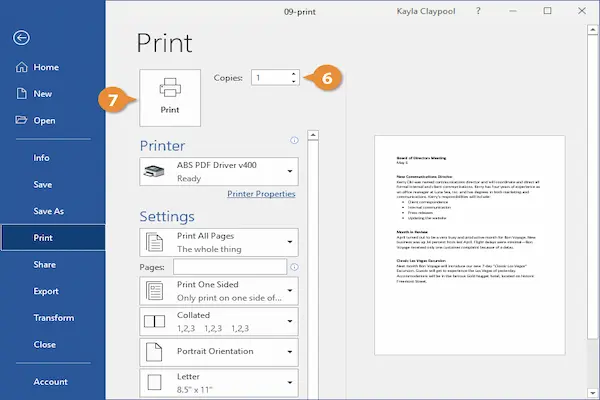
Understanding the Print Dialog Window
The print dialog is the control center for all printing options, and while it may look intimidating, most users only need to understand a few key sections.
Main Sections of the Print Dialog
- Printer selection.
- Page range.
- Copies.
- Layout and orientation.
- Color and quality.
Learning these sections brings clarity.
Using Print Preview Before Printing
Print preview shows exactly how the document will appear on paper, making it one of the most important tools for avoiding mistakes.
Why Print Preview Is Essential
- Shows page breaks.
- Reveals cut content.
- Confirms orientation.
Previewing saves paper and ink.
What to Look for in Print Preview
- Margins look correct.
- Text fits the page.
- Images are not cropped.
If preview looks wrong, printing will be wrong.
Choosing the Correct Paper Size
Paper size mismatches are one of the most frequent causes of cut or scaled prints.
Common Paper Sizes
- A4.
- Letter.
- Legal.
The paper size in settings must match the paper in the printer.
How to Adjust Paper Size
- Open print settings.
- Find Paper Size option.
- Select the correct size.
Never assume the default is correct.
Understanding Page Orientation
Page orientation defines whether the content is printed vertically or horizontally.
Portrait Versus Landscape
- Portrait is vertical.
- Landscape is horizontal.
Choosing the wrong orientation causes awkward layouts.
When to Use Each Orientation
- Portrait for letters and text.
- Landscape for tables and spreadsheets.
Match orientation to content.
Scaling and Fit Options Explained
Scaling controls how content is resized to fit the page.
Common Scaling Options
- Actual size.
- Fit to page.
- Custom percentage.
Fit to page often prevents cut edges.
When Scaling Causes Problems
- Text becomes too small.
- Margins become uneven.
Preview reveals these issues.
Printing Only Specific Pages
Not every document needs to be printed entirely.
Page Range Options
- All pages.
- Current page.
- Custom page range.
This reduces unnecessary printing.
How to Print a Page Range
- Select Pages option.
- Enter page numbers.
Useful for large documents.
Understanding Double Sided Printing
Double sided printing allows printing on both sides of the paper, saving paper and reducing bulk.
Types of Double Sided Printing
- Automatic.
- Manual.
Not all printers support automatic duplex.
How to Enable Double Sided Printing
- Open print settings.
- Find Two sided or Duplex option.
- Select desired binding.
Always check preview afterward.
Choosing the Correct Binding Option
- Long edge for books.
- Short edge for flip style documents.
Wrong binding flips pages incorrectly.
Color Versus Black and White Printing
Many documents do not need color, and printing in black and white saves ink significantly.
When Color Is Necessary
- Charts with color coding.
- Photos.
- Design materials.
When Black and White Is Enough
- Text documents.
- Drafts.
- Forms.
Choose based on purpose.
How to Switch Between Color and Grayscale
Steps to Adjust Color Settings
- Open print settings.
- Find Color options.
- Select Color or Black and White.
This option is often hidden under advanced settings.
Saving Ink Without Losing Readability
Ink costs add up quickly, but small adjustments can reduce usage.
Ink Saving Tips
- Use draft quality for tests.
- Avoid heavy backgrounds.
- Print grayscale when possible.
Draft mode is ideal for previews.
Understanding Print Quality Settings
Print quality affects sharpness and ink usage.
Common Quality Options
- Draft.
- Normal.
- High quality.
Higher quality uses more ink.
Testing Before Printing Important Documents
Testing with a single page prevents costly mistakes.
Simple Test Printing Routine
- Print one page.
- Review result.
- Adjust settings if needed.
This step is especially important for long documents.
Printing From Different Programs
Print dialogs may look slightly different depending on the program used.
Common Programs With Print Options
- Word processors.
- PDF viewers.
- Web browsers.
Core options remain similar.
Printing PDFs Correctly
PDFs often preserve layout, but scaling must be checked.
PDF Printing Tips
- Disable unnecessary scaling.
- Check page size.
PDFs often include their own page size.
Common Printing Mistakes and How to Avoid Them
- Printing without preview.
- Wrong paper size.
- Wrong printer selected.
- Ignoring orientation.
Slow down before clicking Print.
Organizing Documents Before Printing
Well organized files print more predictably.
Organization Tips
- Check document layout.
- Remove blank pages.
- Review margins.
Preparation reduces surprises.
Handling Multi Page Documents
Large documents require extra attention.
Multi Page Printing Tips
- Check page numbering.
- Confirm duplex order.
Preview multiple pages.
Fixing a Print That Came Out Wrong
Mistakes happen, but they are learning opportunities.
Quick Troubleshooting Steps
- Stop printing immediately.
- Review settings.
- Adjust and test again.
Do not repeat the same settings.
Practice Exercise: Printing the Right Way
Exercise 1: Preview First
- Open a document.
- Open print preview.
Exercise 2: Adjust Settings
- Select correct printer.
- Set paper size and orientation.
Exercise 3: Test Print
- Print one page.
- Review output.
Practice builds confidence.
Frequently Asked Questions About How to Print Documents Correctly
Why does my document print too small?
Scaling or paper size is likely incorrect.
Why is my document missing content?
Margins or fit settings may be wrong.
How can I save ink?
Use grayscale and draft mode.
Final Thoughts and a Practical Next Step
Learning how to print documents correctly is not about memorizing every option, but about developing the habit of checking key settings calmly before printing, which prevents waste, frustration, and unnecessary reprints.
When you always confirm the printer, preview the document, choose the correct paper size and orientation, and test before large print jobs, printing becomes a predictable and controlled task instead of a constant source of mistakes.
Could you take a moment the next time you print to pause at the preview screen, review the main options, and run a one page test, just to experience how much smoother the process feels when printing is done intentionally?