Using a Mac without knowing the screenshot shortcuts is a very common situation, especially for users who migrated from Windows or who always relied on menus and mouse clicks instead of keyboard commands, even though macOS offers one of the most powerful and flexible screen capture systems available.
Many Mac users know that it is possible to capture the screen somehow, yet feel insecure about which keys to press, where the images are saved, how to capture only part of the screen, or how to avoid cluttering the desktop with dozens of screenshots that are difficult to organize later.
This guide on how to capture screen on Mac was created to explain, in a clear, objective, and example driven way, all the native screenshot options available on macOS, helping you understand when to use each shortcut, how full screen capture differs from selection capture, where the files are saved, and which extra settings can make the process even easier.
Throughout this article, you will learn the main Mac screenshot shortcuts, how to capture the entire screen, a specific window, or just a selected area, how to use the screenshot toolbar, how to change save locations, and how to apply these captures in practical situations related to work, study, and everyday communication.
The objective is to make screen capture on Mac feel natural and reliable, so you no longer hesitate when you need to save or share something visually.
Understanding What a Screenshot Is on macOS
A screenshot on macOS is an image file that records exactly what appears on your screen at a given moment, including windows, menus, text, images, and layout, preserving the visual context in a way that text descriptions often cannot.
macOS treats screenshots as standard image files, which means they can be moved, renamed, edited, shared, or deleted just like photos or other pictures.
Why Screenshots Are So Useful on a Mac
- Saving important information quickly.
- Sharing instructions visually.
- Recording errors or system messages.
- Creating study notes.
- Supporting work documentation.
Once the shortcuts are learned, screenshots become second nature.
Why Mac Screenshot Shortcuts Feel Confusing at First
Unlike Windows, which relies heavily on a single Print Screen key, macOS uses combinations of keys, and this difference can feel intimidating to new users.
However, the logic behind Mac shortcuts is consistent, and once understood, it becomes easier to remember than it initially seems.
What Makes Mac Screenshot Shortcuts Different
- No single dedicated screenshot key.
- Different shortcuts for different capture types.
- More control built into the system.
This design favors flexibility over simplicity.
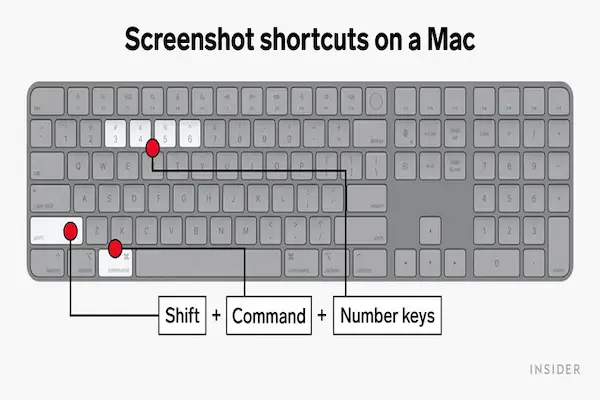
The Most Important Mac Screenshot Shortcuts
macOS provides several native shortcuts, each designed for a specific type of capture.
Learning these shortcuts is the foundation of mastering screen capture on a Mac.
Core Screenshot Shortcuts You Should Know
- Command + Shift + 3.
- Command + Shift + 4.
- Command + Shift + 5.
Each shortcut serves a different purpose.
How to Capture the Entire Screen on Mac
Capturing the entire screen is useful when you want to save everything that is visible, including multiple windows and the desktop background.
Shortcut for Full Screen Capture
- Press Command + Shift + 3.
The screenshot is taken instantly.
What Happens After the Capture
- A thumbnail appears briefly.
- The image is saved automatically.
No further action is required unless you want to edit.
How to Capture a Selected Area on Mac
Capturing only a portion of the screen is one of the most powerful features on macOS, because it allows you to focus on exactly what matters without extra visual clutter.
Shortcut for Selection Capture
- Press Command + Shift + 4.
The cursor changes into a crosshair.
Steps to Capture a Selection
- Press the shortcut.
- Click and drag to select an area.
- Release the mouse or trackpad.
The selected area is captured immediately.
Why Selection Capture Is So Popular
- Avoids unnecessary information.
- Creates cleaner images.
- Improves communication clarity.
This method is ideal for tutorials and explanations.
How to Capture a Specific Window on Mac
Sometimes you want to capture one application window without manually selecting it.
macOS provides a shortcut variation for this purpose.
Window Capture Shortcut
- Press Command + Shift + 4.
- Press the Space bar.
- Click on the desired window.
The window is captured with a clean border.
When Window Capture Works Best
- Error messages.
- Application interfaces.
- Single program documentation.
This method keeps images professional.
Using the Screenshot Toolbar on macOS
Modern versions of macOS include a visual screenshot toolbar that combines all capture options in one place.
How to Open the Screenshot Toolbar
- Press Command + Shift + 5.
A toolbar appears at the bottom of the screen.
What the Screenshot Toolbar Includes
- Capture entire screen.
- Capture selected window.
- Capture selected portion.
- Screen recording options.
- Options menu.
This toolbar is very beginner friendly.
Understanding Screenshot Save Locations on Mac
By default, macOS saves screenshots directly to the Desktop, which is convenient at first but can quickly create clutter.
Default Save Behavior
- Saved as image files.
- Appear on Desktop instantly.
This behavior can be changed.
How to Change Where Screenshots Are Saved
Changing the save location helps keep your Desktop clean and your files organized.
Steps to Change Save Location
- Press Command + Shift + 5.
- Click Options.
- Select a new save location.
You can choose an existing folder or create a new one.
Recommended Save Locations
- Screenshots folder.
- Documents.
- Pictures.
Consistent locations make screenshots easier to find.
Understanding Screenshot File Names
macOS names screenshots automatically using date and time, which is helpful for uniqueness but not always descriptive.
Example of Default Naming
- Screenshot 2026-01-10 at 10.32.45.png
Renaming important screenshots is recommended.
Better Naming Practices
- Include topic or context.
- Add project or subject name.
- Keep names short and clear.
Clear names save time later.
Where Screenshot Files Are Stored Temporarily
When you click the floating thumbnail after capturing, macOS holds the screenshot temporarily before saving.
This moment allows quick edits.
What You Can Do With the Thumbnail
- Edit the image.
- Crop unnecessary parts.
- Add simple markup.
If ignored, the file saves automatically.
Annotating Screenshots on Mac
macOS includes basic markup tools that are often sufficient for everyday needs.
Available Annotation Tools
- Text boxes.
- Shapes.
- Arrows.
- Highlight tools.
Annotations help explain context.
Capturing Screenshots Without Saving to Desktop
Some users prefer copying screenshots directly to the clipboard.
How to Copy Instead of Save
- Add Control key to shortcuts.
Examples
- Command + Control + Shift + 3.
- Command + Control + Shift + 4.
The screenshot can then be pasted into another app.
Using Screenshots in Work Scenarios
Screenshots are essential in professional environments.
Common Work Use Cases
- Reporting system issues.
- Creating guides.
- Documenting processes.
Clear visuals reduce misunderstandings.
Using Screenshots for Study Purposes
Students benefit greatly from screenshots.
Study Related Uses
- Saving slides.
- Capturing diagrams.
- Highlighting key points.
Screenshots support active learning.
Organizing Screenshot Files Effectively
Without organization, screenshots become hard to manage.
Suggested Folder Structure
- Screenshots
- Work.
- Study.
- Personal.
Simple structures work best.
Image Formats Used for Mac Screenshots
macOS saves screenshots as PNG by default.
Why PNG Is Used
- Sharp text.
- High quality.
- Lossless compression.
PNG is ideal for screen content.
Changing Screenshot Format (Advanced Option)
macOS allows format changes, but this is optional.
Common Alternatives
- JPG for smaller files.
- PDF for documents.
Most users can keep the default.
Privacy and Security Considerations
Screenshots can capture sensitive information unintentionally.
Before Sharing a Screenshot
- Check personal data.
- Blur private information.
- Review the full image.
Awareness prevents data exposure.
Common Mistakes When Capturing Screen on Mac
- Using full screen capture unnecessarily.
- Forgetting where files are saved.
- Leaving screenshots unnamed.
- Capturing sensitive content.
Small habits prevent problems.
Practice Exercises to Learn Mac Screenshot Shortcuts
Exercise 1: Full Screen Capture
- Press Command + Shift + 3.
- Locate the saved file.
Exercise 2: Selection Capture
- Press Command + Shift + 4.
- Select a small area.
Exercise 3: Toolbar Use
- Press Command + Shift + 5.
- Explore options.
Short practice builds confidence.
Frequently Asked Questions About How to Capture Screen on Mac
Where do screenshots go by default?
They are saved to the Desktop.
Can I change the save location?
Yes, using the screenshot toolbar.
Is there a way to capture only part of the screen?
Yes, with Command + Shift + 4.
Final Thoughts and a Clear Next Step
Learning how to capture screen on Mac is one of the most useful productivity skills for any macOS user, because screenshots are deeply integrated into the system and can be taken quickly without installing any additional software.
When you understand the main shortcuts, know the difference between full screen and selection captures, and configure save locations that match your organization style, capturing the screen becomes a fast and reliable action instead of a source of confusion.
Could you try right now by pressing Command plus Shift plus 4, selecting a small area of your screen, and checking where the image is saved, just to reinforce how simple and powerful Mac screenshots can be?