Transferring your data to a brand-new phone becomes far less stressful once you understand that modern devices offer surprisingly reliable migration tools, which are designed to preserve photos, contacts, messages, apps, settings, and personal memories with minimal risk, as long as you follow a slow, deliberate sequence of preparation, verification, and final confirmation that everything has moved correctly before wiping your old device.
Because many people worry about losing years of photos, important conversations, account access, and personalized settings, this article walks you through the entire process using clear, safety-focused explanations and three separate migration routes, making sure you understand both what the tools will copy and what you may need to move manually, while also offering thorough checklists and step-by-step instructions for every stage.
Before You Begin: Universal Preparation Steps
Before jumping into your specific transfer path, you will make the final experience smoother by preparing your devices carefully. Longer, calmer preparation results in fewer issues later.
1. Charge and Connect
Ensure both phones have enough battery and a stable internet connection.
-
Charge each phone to at least 60%, preferably more.
-
Connect to a reliable Wi-Fi network.
-
Keep both devices near each other.
2. Update Your Old Phone (Optional but Helpful)
Although not strictly required, updates reduce migration errors.
-
Android: Install the latest available system update.
-
iPhone: Update to the most recent iOS version your device supports.
3. Clean Up Obvious Clutter First
Because transferring junk wastes time and space, it helps to simplify your data:
-
Delete accidental duplicate photos.
-
Remove apps you haven’t opened in years.
-
Clear temporary downloads you no longer need.
4. Know Your Account Passwords
Every transfer requires access to:
-
Google account (for Android)
-
Apple ID (for iPhone)
-
Important app logins (email, banks, social media)
5. Back Up Before Migration (Extra Safety)
Even if the migration tool works perfectly, a backup is your safety net.
-
Android: Use Google Backup.
-
iPhone: Use iCloud Backup or a computer backup via Finder or iTunes.
PART 1 — Android → Android: How to Transfer Data to Your New Android Phone
When moving from an older Android device to a newer one, you can rely on Google’s built-in migration tool, which automatically transfers apps, photos, messages, Wi-Fi passwords, contacts, and settings, creating a nearly identical setup on your new device.
A. What Transfers Automatically
Most everyday essentials transfer seamlessly:
-
Photos and videos stored in Google Photos
-
Contacts backed up to your Google account
-
SMS messages (on most devices)
-
Call history
-
Installed apps from the Play Store
-
Wi-Fi networks and passwords
-
Some settings and permissions
B. What Might Not Transfer
A few things require manual attention:
-
WhatsApp chat history (requires in-app backup)
-
App logins (banking apps, government apps, some email apps)
-
Files stored in external folders or app-specific storage
Step-by-Step: Android → Android Transfer
1. Turn on the New Phone
During setup, it will ask if you want to “Copy apps and data.”
Select Yes to begin.
2. Connect Both Phones
You can transfer data using:
-
Cable connection (fastest and most reliable)
-
Wireless transfer (slower but convenient)
-
Google cloud backup restore
Most new Android phones will suggest using a cable, but wireless works well too.
3. Sign in to Your Google Account
Because Google sync handles much of the migration, signing in ensures smooth restoration.
-
Enter your Gmail and password.
-
Approve sign-in on your old device if prompted.
4. Choose What to Transfer
A detailed list appears on the new phone, usually including:
-
Apps
-
Photos & videos
-
Contacts
-
SMS
-
Device settings
-
Accounts
Select everything unless you intentionally want a lighter setup.
5. Keep Phones Together Until Completion
Migration can take:
-
5–10 minutes for small data
-
20–60 minutes for larger media libraries
6. After Setup: Verify Data
Once your new Android finishes installing apps and restoring files:
-
Open Google Photos to confirm images appear.
-
Check Contacts to ensure names and numbers are present.
-
Open Messages to confirm SMS history migrated.
-
Test email apps and other logins.
PART 2 — iPhone → iPhone: How to Transfer Data to a New iPhone
iPhones offer one of the smoothest migration systems through Quick Start, which allows two devices to communicate directly, copying apps, messages, photos, settings, and Home Screen layouts with surprising accuracy.
A. What Transfers Automatically
Quick Start usually moves:
-
Photos and videos
-
Messages (SMS and iMessage)
-
Apps and app data
-
Home Screen layout and widgets
-
Apple ID settings
-
Wi-Fi networks and passwords
-
Safari data
-
Apple Wallet cards (sometimes requires re-verification)
B. What Might Need Extra Steps
Some details require manual attention:
-
Email passwords
-
Banking apps (identity re-verification)
-
Apps downloaded outside your region
Step-by-Step: iPhone → iPhone Transfer
1. Place Both iPhones Close Together
Turn on the new iPhone and keep the old one unlocked near it.
A “Set Up New iPhone” popup will appear.
2. Use the Quick Start Animation
Point the old phone’s camera toward the animation displayed on the new one.
This securely pairs them.
3. Choose “Transfer Directly from iPhone”
This method creates a near-perfect copy.
4. Keep Both Phones Plugged Into Power
Large photo libraries may take a long time.
5. Confirm Apple ID and Settings
During migration, the new phone asks about:
-
Face ID or Touch ID setup
-
Siri preferences
-
Location and privacy settings
6. Wait for Apps and Photos to Restore
Apps download from the App Store; photos download from iCloud if you use iCloud Photos.
7. After Setup: Verify Everything
Check:
-
Messages
-
Photos
-
iCloud Drive
-
App logins
-
Apple Wallet
PART 3 — Android → iPhone: How to Transfer Data to a New iPhone
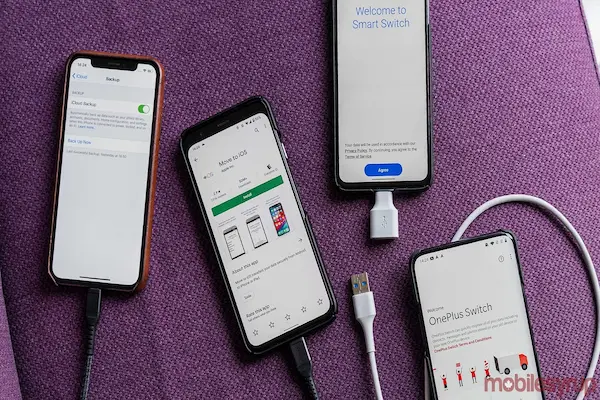
Moving from Android to an iPhone works through Apple’s “Move to iOS” tool, which copies your essential data to the new device.
A. What Transfers with Move to iOS
The tool can migrate:
-
Contacts
-
SMS messages
-
Photos and videos
-
Calendars
-
Google accounts
-
Some app equivalents
B. What Does NOT Transfer Automatically
You will need to handle:
-
WhatsApp (in-app transfer now supported on many devices)
-
Apps (Android apps don’t move; iPhone downloads iOS versions)
-
Phone call logs
-
Music downloaded outside streaming services
Step-by-Step: Android → iPhone
1. Start iPhone Setup
On the “Apps & Data” screen, select Move Data from Android.
2. Install Move to iOS on the Android Device
Follow the on-screen code displayed on the iPhone.
3. Connect Both Devices
A local, temporary Wi-Fi connection forms between them.
4. Choose What to Transfer
Typically includes:
-
Contacts
-
Messages
-
Camera Roll photos
-
Videos
-
Calendars
-
Google account details
5. Wait for the Transfer to Complete
Do not switch apps or let the Android screen turn off.
6. Finish iPhone Setup
Once the transfer ends:
-
The iPhone continues setup normally.
-
It may take time to organize photos.
7. Install iOS Versions of Your Apps
Open the App Store and download replacements.
Post-Migration Audit: Confirm Everything Moved Safely
After your new phone seems ready, perform a careful audit so you don’t accidentally miss missing data.
Checklist: Your Data Should Be Visible and Intact
1. Photos & Videos
Open your gallery or cloud app to confirm:
-
Albums exist
-
Videos play normally
-
Recent shots appear
2. Contacts
Check:
-
Name spelling
-
Duplicates
-
Missing numbers
3. Messages
Confirm:
-
SMS history
-
Group chats
-
Media attachments
4. Apps
Look for:
-
Login prompts
-
Missing apps
-
Authentication requests
5. Accounts
Review:
-
Email
-
Cloud storage
-
Banking logins
-
Social media
6. Cloud Sync
Ensure:
-
Google Photos toggle is ON
-
iCloud Photos is active
-
WhatsApp backup works
What You Can Delete on Your Old Phone (After You Confirm Everything)
Once you know your migration is complete, you may prepare to factory reset the old device, but only after triple-checking your data.
Safe to Delete After Backup
-
Old device system data
-
Apps
-
Media already moved
-
Cached files
Not Safe to Delete Until Verified
-
Two-factor authentication apps
-
Password manager
-
SIM card data
-
App-specific backups
Helpful Maintenance Tips After Migration
To keep your new phone organized and safe, adopt simple monthly habits:
Monthly Checklist
-
Review storage usage
-
Delete screenshots you no longer need
-
Confirm cloud backups still run
-
Update apps and system software
-
Back up photos manually if needed
Final Thoughts
Migrating to a new phone becomes much less intimidating when you follow a calm, structured routine that respects the value of your photos, messages, and memories, and takes into account the small but important differences between Android-to-Android, iPhone-to-iPhone, and Android-to-iPhone transfers. When you prepare thoroughly, verify each step, maintain reliable backups, and review your data afterward, you dramatically reduce the chances of losing anything meaningful, allowing you to enjoy your new device with confidence and peace of mind.